|
Fit
and Trim: Dressing Up Doors and Windows
Room Remodeling: Door and Window Trim
Windows and doors are like pictures on the wall. As such, the same
considerations that go into picture frames should also go into the
moldings around these doors and windows. Dress them up with some
fancy or unusual moldings, but don't stop with the selection available
from the local lumberyard. Select the design and wood you want by
creating your own moldings.
Here's
how:
Plan
your trim. Decide what kind of trim you want. Window trim that
meets with the stool is called conventional framing. Choose between
mitered corners at the top or use corner blocks. Corner blocks allow
you to butt join the trim. This is an easy way to add a decorative
treatment to the framing. Around the doors the trim goes to the
floor or joins with a block of wood (plinth) at the baseboard. The
method of treating windows with no stools is called picture framing.
Remember: When measuring for mitered framing, add twice the width
of the stock to the length of each frame member.
Design
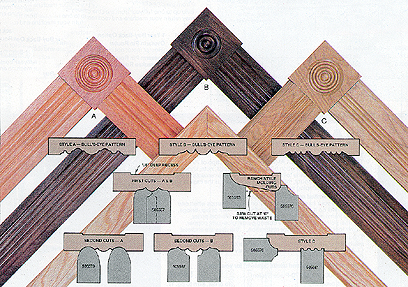
the contours. Use molding knives from the molding attachment
as templates to draw the contours you want. Then, move knives into
various positions to get different contours. Keep in mind that the
contours on the knives are slightly longer than the actual cut.
Remember that the table saw can be used for bevels and chamfers,
and the lathe can be used for turning the corner blocks on screw
centers. Plan on making extra trim to avoid duplicating machine
setups.
Prepare
stock. First, rip all stock to width. Use only straight, true
and clear stock for your moldings. Ponderosa pine, fir, poplar,
walnut, oak, cherry, mahogany and butternut have all been used extensively
in finish carpentry work.
After
ripping the stock to width, cut the 1/8-in. deep relief in the back
using the 1-in. blank knife set of the molding attachment or use
the Dado attachment. This relief will allow you to adjust to inconsistencies
between the wall and the door or window jamb.
Mold
the trim. Set up the Mark V with the molder head in place. Use
scrap stock to locate the proper settings for your table and fence.
 Use
the molding jig to make this operation easier and safer. If you
Counterbore for the bolt heads on both sides of the fence, you'll
be able to attach it on either side of the rip fence for use on
the left or right side of the table. Use
the molding jig to make this operation easier and safer. If you
Counterbore for the bolt heads on both sides of the fence, you'll
be able to attach it on either side of the rip fence for use on
the left or right side of the table.
For narrow trim, mold the edge of a wide board then saw the part
off that you want. Be sure to use push blocks, and feather boards
at all times on these operations.
Install
the trim. Use the Mark V as a cut-off and miter saw. Use finish
nails to attach the molding and use a nail set to countersink the
nails. Fill the nail holes with wood putty and apply the finish
of your choice.
For
further reading: Thomas H. Jones, "All About Moldings,"Mechanix
Illustrated, May 1983, pp. 51-55.
From Tree to Trim, Western Wood Molding and Millwork Producers,
P.O. Box 25278, Portland, OR 97225.

|