|
Turning
A Wooden Place Setting
Hands On Nov/Dec 80
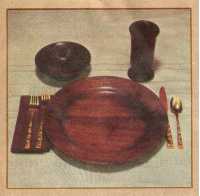 For
most of us, it was our first woodworking project – turning a bowl
on a lathe. But afterwards we went on to bigger and better things,
and forgot about that simple bowl that once had us basking in the
glory of our own accomplishment. For
most of us, it was our first woodworking project – turning a bowl
on a lathe. But afterwards we went on to bigger and better things,
and forgot about that simple bowl that once had us basking in the
glory of our own accomplishment.
However,
turning wooden utensils is more than just an educational exercise.
Few woodworkers have mastered it; most of us are still trying and
learning. But with just a little bit of practice, you can do simple,
beautiful bowls, plates, and goblets.
The
materials
Kitchen and dining utensils have to stand up under a lot of abuse.
Bowls and plates are constantly banged and scraped with forks and
spoons. Soup bowls and goblets have to hold both hot and cold liquids.
And all utensils need to be washed again and again.
In
general, close-grained hardwoods make more serviceable goblets,
bowls, and plates than softwoods. They resist indentation and the
density of the wood helps to repel moisture.
Oily woods do better than those with few natural oils. Teak and
rosewood are permeated with oils that prevent them from absorbing
moisture. With other woods, it’s advisable to apply a lavish coat
of waterproof finish and hope that it soaks in. But this soaking
is at best an imperfect substitute for a wood’s own natural, waterproofing
oils.
In considering what materials to turn, you may have to make some
tradeoffs. Cherry, for example, doesn’t have the natural oils that
rosewood has, but it’s easier to find and a lot less expensive.
Cedar, although it’s not a hardwood, is inexpensive, loaded with
oils, and will not absorb odors from the foods it comes in contact
with.
Laminating rings
 When
you turned that first bowl, you probably used a solid laminated
block of wood. And you scraped and scraped and scraped and scraped
until the center was hollowed out and the sides were sloped. However,
there’s an easier and more economical way to turn bowls and plates
without wasting all that time – and wood. When
you turned that first bowl, you probably used a solid laminated
block of wood. And you scraped and scraped and scraped and scraped
until the center was hollowed out and the sides were sloped. However,
there’s an easier and more economical way to turn bowls and plates
without wasting all that time – and wood.
It
involves stacking overlapping concentric rings. These rings are
cut with either a Bandsaw or jigsaw from a single piece of wood.
After cutting, these rings are stacked in a cone-shape. Turning
is faster because the shape of the object is partially formed.
To
cut out these concentric rings, use a compass to make several circles
on top of the board used. The circles will be cut out at an angle
– that angle is determined by the shape you want your finished turning
to have and the slope of its sides.
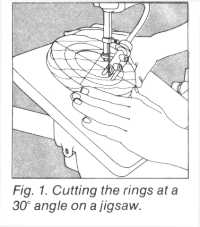
If you use a jigsaw, you’ll have to drill several 1/8" pilot holes
to start the cuts. Be sure these holes are drilled at the same angle
as the cuts you’re about to make. Tilt the jigsaw table at the desired
angle, slip a 1/8" blade through a pilot hole, and cut. Repeat until
you have separated all the rings. Fig. 1. Cutting the rings at a
30 degree angle on a jigsaw.
 The
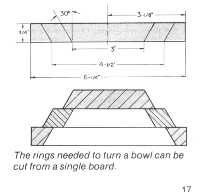
rings needed to turn a bowl can be cut from a single board. The
rings needed to turn a bowl can be cut from a single board.
If you use a Bandsaw, split the board down the middle instead of
making pilot holes. Cut out each half-ring with the Bandsaw table
tilted at the proper angle. Glue these rings back together with
waterproof glue.
Stack
the rings one on top the other and glue them together with waterproof
resorcinol glue. If you’re working with a dense, oily wood like
rosewood or teak, wipe the gluing surface with paint thinner before
applying the glue to get a better bond.
Be
sure that after you’ve stacked the rings, all the grains run in
the same direction. Laminating the grains perpendicular to each
other will in some cases increase the strength of a piece; but n
this case, it will also increase the likelihood of splitting out.
Wood expands up to ten times as much across the grain as with the
grain when it comes in contact with moisture. By running all the
grains in the same direction, you insure that the laminations don’t
fight each other.
 Mounting Mounting
To properly turn bowls and plates, you need to mount your stock
on a faceplate twice. The first mounting allows you to turn the
outside and the base of the utensil; with the second mounting, you
turn the inside.
Select the proper size faceplate or screw mount and attach a mounting
block to it. This block should be solid wood with no cracks or checks.
Center the mounting block and glue it in place with white or yellow
glue and a paper spacer between the mounting block and the turning
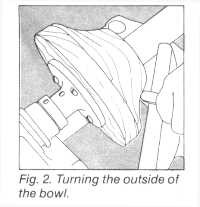
stock. Allow the glue to dry overnight before turning. When dry,
turn the outside of the bowl to the desired shape. Fig. 2. Turning
the outside of the bowl.
Separate
the turning from the block by carefully wedging them apart with
a chisel. The paper spacer will insure that they come apart cleanly
and easily, without tearing wood away from the turning stock.
Replace
the mounting block with another that will fit inside the turned
base, glue it to the stock as before. Turn the inside of the piece,
separate it from the mount, and clean off the glue with a chisel
and a little water.
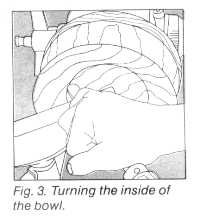
Fig.
3. Turning the inside of the bowl.
Turning
a bowl and plate
 The
bowl and plate pictured here were each made from a single piece
of 3/4" thick stock – the piece used to form the bowl was 6-1/2"
square; the one used to form the plate was 12-1/2" square. The
bowl and plate pictured here were each made from a single piece
of 3/4" thick stock – the piece used to form the bowl was 6-1/2"
square; the one used to form the plate was 12-1/2" square.
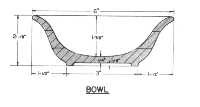 To
make the rings for the bowl, draw three concentric circles on the
stock 3", 4-1/2", and 6-1/4" in diameter. Cut these on a 30 degree
angle from vertical. To
make the rings for the bowl, draw three concentric circles on the
stock 3", 4-1/2", and 6-1/4" in diameter. Cut these on a 30 degree
angle from vertical.
To
make the rings for the plate, draw two concentric circles 9-1/2"
and 12-1/2" in diameter, and cut on a 45 degree angle.
Laminate
the rings, mount the turning stock, and turn the outside and inside
contours.
 Turning
a goblet Turning
a goblet
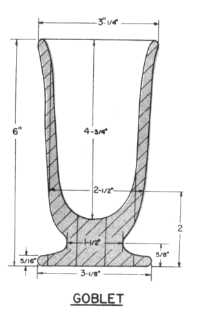
Unlike the bowl and plate, the best way to turn a goblet or utensil
with nearly vertical sides is to use a solid block of wood. Cut
or laminate a block 6" high and 3-3/4" on a side. Mount this using
either the screw center or small faceplate.
Turn
the outside of the goblet as if you were doing spindle turning –
using the Tailstock and dead center. After you’ve shaped the outside,
remove the dead center from the Tailstock and replace it with the
chuck arbor. Mount the drill chuck on the chuck arbor, and a 1-3/4"
drill bit in the chuck. With the drill bit stationary and the workpiece
turning, use the quill to drill out most of the inside contour of
the goblet. Afterwards, finish turning the inside as you did the
bowl and plate.
Pad
Finishing
After sanding the workpiece smooth, keep it turning. Dip a #00 steel
wool pad in a non-toxic finish such as mineral oil or salad bowl
finish. Apply the finish evenly and liberally to the surface of
the utensil as it turns. Squeeze the pad gently to achieve a uniform
flow of finish onto the wood. Keep the wood wet for at least 5 minutes,
giving the finish a chance to soak in.
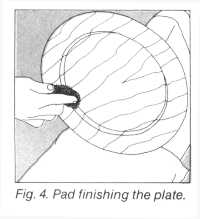
Fig.
4. Pad finishing the plate.
Apply
at least two coats of finish – you can apply the second one a little
more sparingly tan the first. As the wood turns, the fine steel
wool will buff the finish to a soft luster. Separate the piece from
the mount, scrape away the glue, and apply a coat to the area where
the mount mated to the utensil.
By
keeping several turnings going at once, turning one while the glue
on another cures and the finish on a third dries, you can turn four
or more place settings in a few days. Your new place setting may
not have the sentimental value of your first bowl, but you can be
just as proud.
|