|
Molding:
Instant Elegance
The simplest way to put an end to 'problem' rooms is through the
use of decorative molding. When properly used, molding creates an
optical illusion of space and height and adds new visual reference
points to an otherwise plain room. Molding can accentuate a pleasing
feature of a room, such as a bay window or fireplace, or conversely
draw the eye away from problem areas, such as low ceilings or narrow
hallways.
The
key to molding placement lies in the color, size, and shape of your
room. Spatial problems are generally present in an empty white room
because the walls appear larger and closer than they really are.
A few strips of creatively placed molding can visually 'pull' the
walls apart, giving the illusion of added floor space and wall height.
A strip of crown molding softens sharp lines at the wall and ceiling
junction and adds an architectural lift to your room.
In
this article, we're focusing on ceiling moldings, although the basic
ideas mentioned here can apply to other types of moldings, such
as baseboard or chair rail. Just a couple of molding knives can
cut an intricate pattern for virtually any type of molding. You
might want to try a few 'test' strips of wood, combining different
knife cuts to achieve the results you desire. After all, half the
fun of owning your own equipment is creative experimentation. Why
limit yourself to what's readily available in the lumberyard or
homecenter?
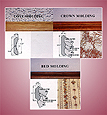
Planning
There are basically three kinds of ceiling molding: crown, bead,
and cove. Crown and cove moldings are 'sprung' which means they
have beveled edges that span the ceiling/wall joint (versus a molding
that snugs in a 90 degree angle), thereby resting on the ceiling
and wall surfaces. The molding adjusts to minor irregularities and
creates a clean, soft line where the ceiling and wall meets. Bead
molding can be sprung, like crown and cove molding, or it can be
plain, meaning it fits snugly into the ceiling/wall joint. Unless
this joint is as close to square as possible, sprung moldings offer
the greatest coverage for irregularities in your ceiling or walls.
Select
and prepare stock
Select your stock according to your budget and decorating scheme.
The best molding comes from straight, clear stock, free of knots
and warpage. Clear pine is the least expensive, but oak, walnut
or cherry are naturally richer and will show more grain. Rip the
stock to required widths, and be sure to prepare extra stock (about
20% more than you think you'll use) to allow for cutting errors.
Cut
the profiles
As mentioned before, just a couple of molding knives will cut an
intricate, appealing profile. Standard crown and bed molding requires
the use of only two knives; cove molding, on the other hand, can
be made entirely on a table saw. Arrange the molding knives to create
the profile you want, and make the profile cuts. Be sure to use
push blocks, push sticks, feather boards and roller stand for safety.
Bevel
molding
After you've cut the profiles, tilt the table 45 degrees, mount
the rip fence below the blade and use a feather board to guide the
stock.
Drilling
and finishing
Once you've cut the bevels on the molding, drill 7/64" pilot holes
for 8d finish nails. If your ceiling joists can be located and marked
on your molding, drill at least one pilot hole where the molding
will cross the joist. Or, you can wait until you're actually installing
the molding to locate the joist, whichever is more convenient.
Unless
you plan to paint the molding to match or complement the exact color
of your wall, it's best to apply stain or paint to your molding
prior to installation. The same rule applies for the wall itself,
it's easier to paint or paper the wall before you hang the molding.
Select the stain or paint you prefer and apply it to your molding
with straight, even strokes.
Install
the molding
A rule of thumb for ciling molding installation is to start on the
longest wall first. Cut the lengths a tad long so they can be lightly
sprung into position. Place a 8d nail through the pilot holes and
nail through the drywall or plaster into the upper wall plate. If
your molding is large, nail through each ceiling joist that the
molding crosses. Countersink the nails and fill the holes with putty
that matches the finish of your molding.
You'll
be amazed how a small investment in decorative molding greatly enhances
the appearance of your once plain room.
|

