|
Christmas
Tree Ornaments
By Allen Mills
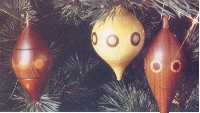 You
can begin a holiday tradition by turning these ornaments from your
favorite hardwoods, and giving the ornaments as gifts to friends
and relatives. The ornaments can be made in a minimal amount of
time and each can be uniquely crafted to create an endless variety
of designs. For starters, here are my three designs. You
can begin a holiday tradition by turning these ornaments from your
favorite hardwoods, and giving the ornaments as gifts to friends
and relatives. The ornaments can be made in a minimal amount of
time and each can be uniquely crafted to create an endless variety
of designs. For starters, here are my three designs.
-
Using
a lathe, place the block of wood between centers and turn to
a rough cylinder. Any size will do, but I start with 2-1/2 "-3"
thick and 6" long.
-
Mark
the location for the plug holes around the circumference of
the cylinder. For accurate spacing, wrap a piece of masking
tape around the circumference and mark the two ends. Peel it
off, stretch it on a flat surface, and with a ruler, mark off
equal sections.
-
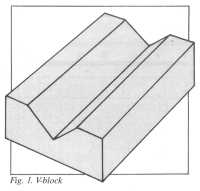
Drill
3/4" deep holes for the plugs. To hold the cylinder steady while
drilling, make a V-notched block of wood (see fig.1).
-
Use
a plug cutter to cut plugs from 3/4 " stock. Glue the edges
of the holes. With a mallet, tap the plugs in place, If a double
inlayed plug is desired, drill a smaller hole through the center
of the first plug and insert the appropriate size plug into
the new hole. Note: Dowel rods can be substituted for plugs.
-
Turn
the plugged cylinder to the desired shape and sand. I start
with 100-grit sandpaper and work down to 220-grit.
-
While
the turning is still on the lathe, apply the finish of your
choice. (For these ornaments, I used Danish oil.)
-
Remove
the turning from the lathe and cut the ends off with a coping
saw. Lightly touch up the ends with sandpaper, and apply finish
to the ends.
-
Drill
a small hole for the Christmas tree hook. To add character to
the ornament, I make the hooks form brass wire coated with lacquer
(to prevent tarnishing).
 |


