|
Bowl
Turning on the Shopsmith MARK V
By Dick Gerard

As
I tell my students, there are no right or wrong ways to turn. If
you are happy with a particular tool making a particular cut or
scrape, and if you are pleased with the end results, then that is
the "right" way to do it.
The
Secrets of the Gouge
Using
the gouge to turn bowls has been explained in books such as "Creative
Woodturning" by Dale Nish. This book, and others, can show you the
proper way to handle a gouge. Additionally, many video tapes are
available. The best way to learn, is of course to take lessons from
someone who knows how, lots of practice and follow these 10 secrets
to using a gouge:
-
Keep
it sharp
-
Keep
the bevel LIGHTLY rubbing the wood.
-
Keep
it sharp.
-
Don’t
grip the handle as if you were trying to choke a snake.
-
Keep
it sharp.
-
Keep
loose. Relax. Turning is FUN!
-
Keep
it sharp.
-
Roll
the flute in the direction of the cut.
-
Snuggle
in close to the lathe. Use a compact stance.
-
Keep
it sharp!
Shopsmith
MARK V Advantages
For
faceplate turning of plates, platters, and bowls, the Shopsmith
MARK V offers two distinct advantages over most other lathes. First,
the tool rest and headstock assemblies may be moved to the right
hand end of the ways. This allows the use of long handled tools
without interference with the ways as is common on most other lathes.
Second, by locking the quill in an extended position, the tool rest
may be placed behind the turning. This allows the turner to reach
areas of a turning that may require modification as the turning
progresses.
 Preparation
of the Bowl Blank Preparation
of the Bowl Blank
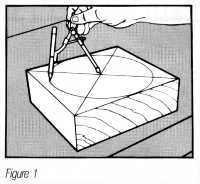
First, select your turning stock, Next, inspect the stock for visible
defects that would hinder turning or that would force a change of
design. Then, decide which surface will be the TOP of the bowl.
This surface will hold the faceplate as you turn the OUTSIDE form.
Next, using a straight edge, draw intersecting lines through opposing
corners. Where the lines cross determines the center point of the
turning. Using a compass, draw the largest circle possible. (Figure
1) Make sure that the compass leg leaves a distinct impression at
the CENTER point. Using the Bandsaw, cut the blank into a circular
form. Next, inspect the freshly cut edges to see if you have uncovered
previously hidden 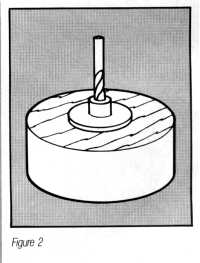 defects.
If new defects are found, then consider whether they will be eliminated
in the turning process, or whether you should re-orient the turning
blank by use of a new center. Whatever the outcome, also inspect
the bowl blank to ensure that you have used the grain and figure
to the best extent. Next, place a 5/8" brad-point drill bit in the
depression left by the compass point. Then slide the appropriate
size faceplate over the drill bit and, using sheet metal screws
(number 12 or 14, 1" to 1-1/4" long), fasten the faceplate to the
wood. (Figure 2) Remove the drill bit and proceed to the lathe. defects.
If new defects are found, then consider whether they will be eliminated
in the turning process, or whether you should re-orient the turning
blank by use of a new center. Whatever the outcome, also inspect
the bowl blank to ensure that you have used the grain and figure
to the best extent. Next, place a 5/8" brad-point drill bit in the
depression left by the compass point. Then slide the appropriate
size faceplate over the drill bit and, using sheet metal screws
(number 12 or 14, 1" to 1-1/4" long), fasten the faceplate to the
wood. (Figure 2) Remove the drill bit and proceed to the lathe.
On
to the Lathe
Check to make sure the speed dial is at the lowest possible speed.
Further, check that the workspace is clear, there are no impediments
to safe walking and that you have adequate lighting. After the wood
is mounted on the lathe, rotate the stock by hand to see if there
are any "heavy" spots in the bowl blank. Most timbers are NOT uniformly
dense. When satisfied with the balance, position the tool rest as
described earlier and again rotate the stock to make sure that the
wood clears the tool rest. About 1/8" clearance is sufficient. After
donning ear, face and lung protectors, move to the left of the headstock
and switch on the power. Almost immediately, you can tell whether
or not the piece needs further balancing. If it does, immediately
switch off the power, ty another center, or trim the high spots
with the Bandsaw, and try again. On larger pieces and for bowls
made from heavily figured timbers, always begin by using the tail
stock and a ball bearing center for additional support. Assuming
the blank is balanced, start the motor and leave the speed dial
at "slow" to rough down the outside and bottom of the blank. Remember,
the top of the bowl is attached to the faceplate.
 Turning
the Outside Turning
the Outside
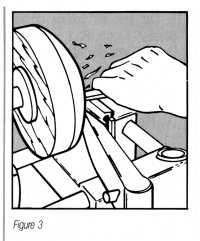
Using either a long bowl gouge or a shallow spindle gouge, turn
from the foot to the rim to create a form. (Figure 3) As the turning
progresses, constantly evaluate the form and occasionally stop to
readjust the tool rest to keep it as close to the wood as possible.
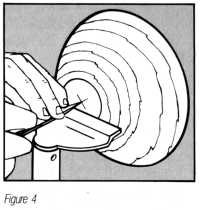
When satisfied with the outer shape, sand to the desired level,
turn a foot for a spigot chuck or flatten the base of the foot to
use a scrap block glued to the bowl blank using a paper glue joint.
To properly center this block, bring the tool rest up close to the
base, with the height set just below midpoint. Then using a sharp
awl, make a very shallow indent at the exact center of rotation.
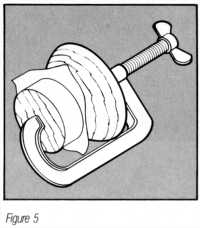
(Figure 4) Remove the turning from the lathe. Remove the bowl from
the faceplate. Apply yellow woodworkers glue to both the scrap block
and turning block and to the paper. Use the 5/8" brad-point drill
bit as explained before to locate the faceplate over the exact center
of the turning. Remove the drill bit and place the whole assembly
in a vise or clamp. (Figure 5) Leave there overnight to let glue
dry completely. Remove the clamp.
 Turning
the Inside Turning
the Inside
Make sure that the speed dial is again at the slowest setting, mount
the faceplate with stock, stand to the left and turn the power on.
If all has gone according to plan, the piece will be centered. If
it appears that the pieces not perfectly centered, stop the power
and bring the tail stock assembly (using the live center) in to
help support the bowl blank. This will necessitate using the quill
in a slightly extended position, but this is good. The extended
quill will allow you to true up the exterior and sand as before.
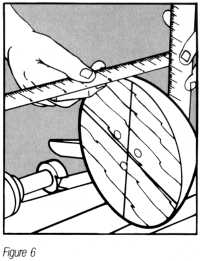
Then, replace the live center with the Jacobs chuck and the largest,
sharpest drill bit that will fit within the area of the top, but
not larger than the planed inside diameter at the foot of the piece.
Measure from the top of the bowl to the top of the foot. (Figure
6) Transfer this measurement, minus Ľ", to your depth stop with
the drill bit touching the stock. Using the quill feed, drill out
the center of the bowl to the depth indicated on the depth stop.
The extra Ľ" is "in case". In case anything goes wrong…and if you
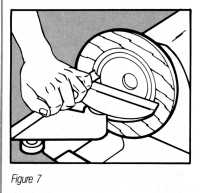
don’t plan on it going wrong, IT WILL! Next, using the bowl gouge,
remove the bulk of the inside of the bowl down to the already established
bottom. (Figure 7) Wall thickness is something to be decided by
each turner. However, one of the hallmarks of a good turner is that
whatever the wall thinness of thickness, it will be uniform from
rim to bottom (with a very slight thickening at the base allowed).
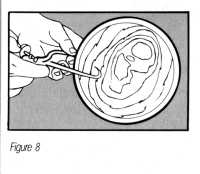
Stop the lathe and use calipers to gauge the thickness. Then remove
the thick spots as you go. (Figure 8) Using a freshly ground bowl
gouge, take a light finishing cut from rim to bottom. Sand to the
desired degree, apply the finish of your choice, remove from the
lathe and be careful not to drop it on the floor on the way in to
show your family and friends.
|


